
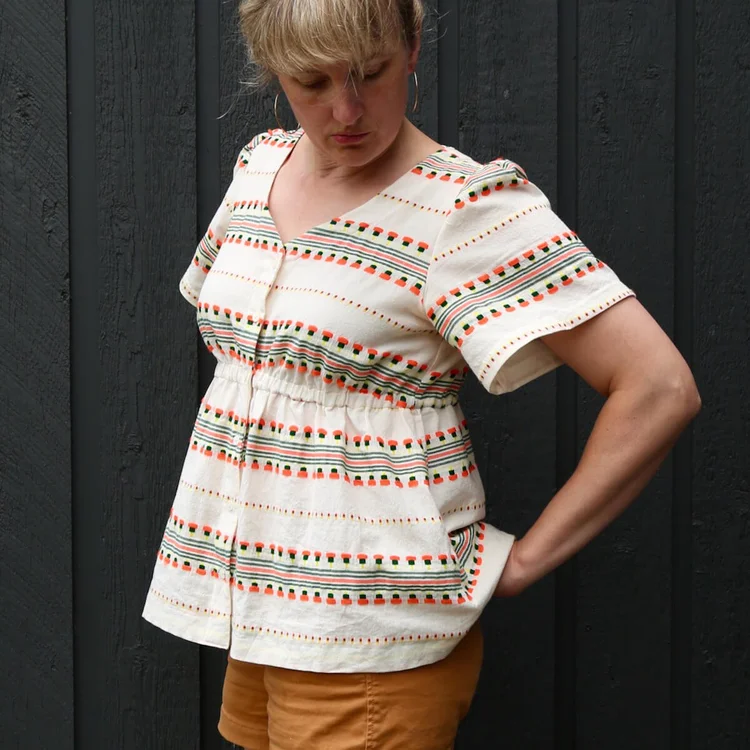
My woven cotton Sapphire top
In the leadup to the Sapphire launch, I thought it would be fun to do a series of posts about each of the Sapphire dresses and tops I’ve made for myself (this is the third). Plan is to post some photos along with a few notes on each dress so you can learn about the fabric I chose and any mods or adjustments to the pattern pieces that I made.


PATTERN
Sapphire (coming soon!), with the shorter sleeve and top length. A few notes on things I changed for this version:
Down a size
For this version, I went down a size - wanted to experiment with the sizing to see how much wiggle room there was. I also had just a yard and a half of this lovely fabric so I had to get a little creative and just barely eeked out the pieces (I had to shorten some of them a bit - see next note). My verdict is that this one is just a little too small on me - it would look and fit better if I had made my true size (I usually make the size E with the smaller front bodice, and this was a size D). That said, you can see that it isn’t terrible, either? So just know that you may be able to go down a size if you want a slightly more fitted style, or if you have a fabric that grows or has some stretch. Which reminds me to point out that there are two bodices available for all sizes - one with a smaller “dart” and one with a larger “dart,” though the dart instep is gathered on Sapphire rather than sewn as a triangular seam so I just called them “smaller” and “larger” for Sapphire.
Shorter hems
I made the skirt pieces shorter by about an inch than the pattern pieces and I also made the sleeves shorter. With cottons you may find that the fabric doesn’t drape quite as much as with some of the other recommended fabrics, so gathers at the top of the sleeves will “stand up” a bit more, so you may prefer to make them a little shorter to balance out all a bit of the poofiness of the sleeve. Spellcheck doesn’t like the word poofiness but I assure you it is a word. At any rate I don’t really consider lengthening and shortening hems much of a modification but I think it might be helpful if you’re trying to sew you Sapphire top to look more or less like this version.
Button placement
There is also quite a bit of wiggle room when it comes to how you place your buttons. Instead of placing the third button from the top just above the elastic, I sewed it over top of the elastic, directly over the hook and eye. Fairly early in the process of designing this pattern, I discovered that it doesn’t really work to have a buttonhole right over the elastic; not only is it difficult to sew (as the elastic casing adds layers to the garment that you have to sew through), but the elastic pulls the buttonhole open. So my opinion is that it’s better to have a hook and eye at that spot and do a “faux” button like I did here, or just place the button slightly over the elastic, which is how I wrote the pattern. Either works! You may have a better idea - that’s great — do it!!

Fabric notes:
This is an Indian cotton from Merchant and Mills called Garcia Stripe. They describe it as a soft dobby. The thing I love about this fabric is that the colorful orange, neon yellow, and dark green threads are woven into the cream base (which is a loose-weave, lightweight cotton) to create the woven pattern, and they’re a soft yarn, so it has a nice texture. You can find this fabric over at Domesticity, it is in stock as of this writing.
Good news - the Sapphire Pattern is coming soon - so watch this space for updates on when it is ready! Get details and see more photos and posts over on the Sapphire page:
And get ready for this pattern with the notes and charts in my Get Ready for Sapphire! post.
PS. Sign up for my newsletter or substack if you want to be the first to know when it drops!