
How to make Beatrix with a flat hem
A couple of years ago I sewed and posted this cropped Beatrix, which has become one of my favorite Beatrix tops to wear:

In the original Beatrix pattern (pre-update), “view B” had a flat hem which was made by cropping the bodice (see it here) and adding two rectangular hem bands to the bottom while “view A” had the curved hem. After noticing that almost no one ever made view B (except to steal the button placket and add it to view a), for the update I decided to replace it with the view a+b mashup which had been far more popular, so popular that Jess wrote this view a+b tutorial for my blog.

When I posted this (slightly) cropped version in 2022, I included a very brief how-to in the post which involved using the view B cutting line from the original pattern. At that point, though, I had already started updating the pattern and knew I was going to eventually omit that cutting line and view, so I made a mental note to create a tutorial (this post!) later.
So here we are: the newly updated Beatrix pattern still has two views, but both of them feature curved hems, which means the pattern no longer has a flat hem option. So here’s a quick tutorial for how to make Beatrix with a flat hem! Because Beatrix with a flat hem is still super fun and cute!!

Step 1. Draw the crop lines on your bodice pattern pieces
First, trace your front and back bodice pattern pieces (along with the rest of your pieces). Then, use a ruler to draw a flat line across the bottom of the bodices, starting where the hem hits the side seam. Important!! Keep the line parallel to the lengthen/shorten lines on the pattern pieces.
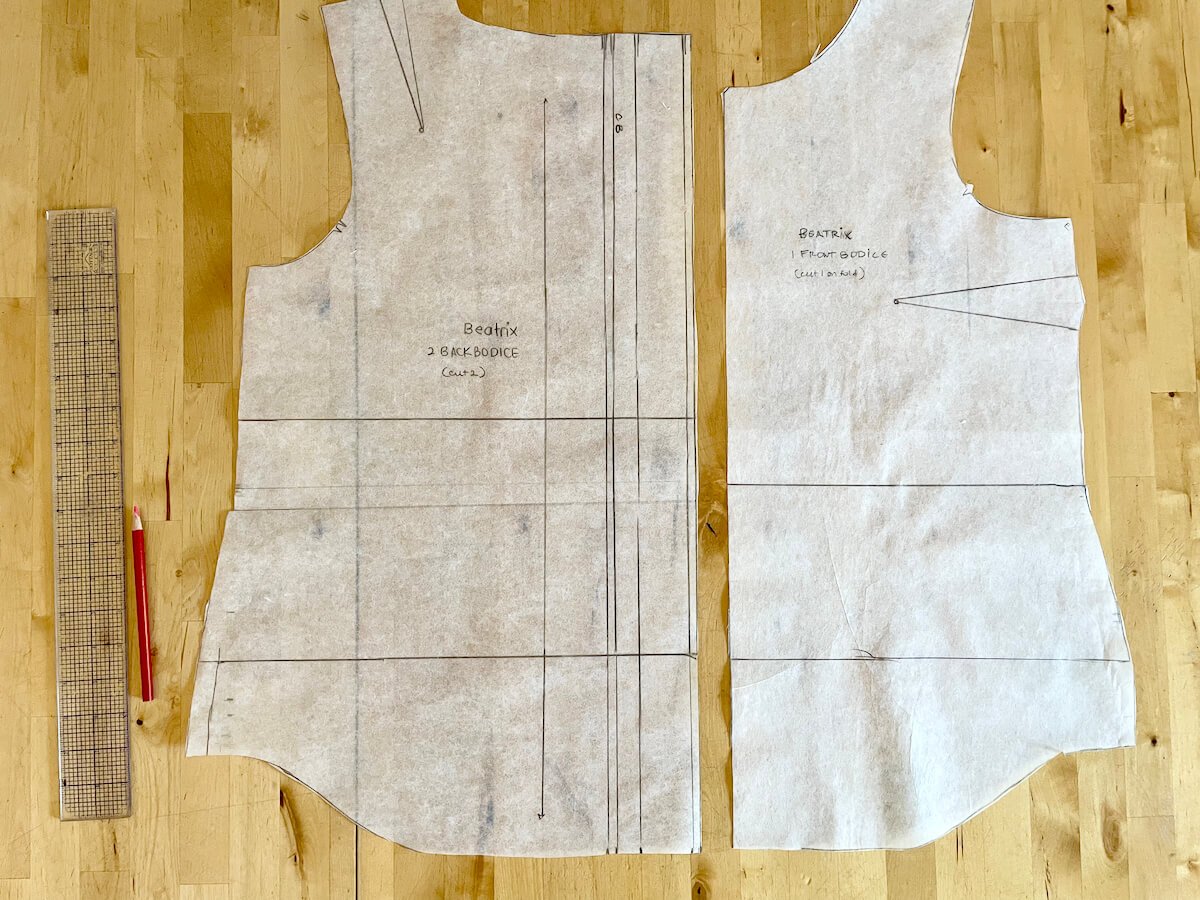


Step 2. Draw in dots for SIDE vents
Measure 4” up the side of the pattern piece from the crop line you just made. Draw a dot along the seam line (1/2” in from the edge) at this position. These dots mark the end of the side seam to create the side vents.

Step 3. Fold pattern pieces along crop line
Rather than chopping off the bottom of the pattern piece, I prefer to fold the pattern piece up (you can tape it in place if you want) to keep it out of the way while I’m cutting out the fabric.

Step 4. Cut out pieces and sew steps 1-3
Cut out all of your fabric pieces and assemble Beatrix up to the side seams (steps 1-3). I find it easiest to use view a of the pattern (where the button placket is created by folding up the back piece rather than a separate button placket), but if you want a separate or contrast button placket, follow cutting instructions for view b. Just make sure to cut the button placket pieces shorter, to match the back center length of the bodice (which is now cropped).
Step 5. Sew the side seams
Sew the front and back together along each side with a 1/2” seam allowance, starting at the armpit and ending at the dot. Stitch back and forth a little bit at the dot to reinforce the stitches. (Note: if you don’t want the little side vents, sew all the way to the hem and skip the next step in this tutorial).

Step 6. Create vents
Press the side seam allowances open, fold the raw edges under 1/4”, and edgestitch along the fold to finish the vents.

Step 7. SEW THE REST OF the top together, FINISH HEMS
At this point, you’ll pick back up with the sewing instructions from step 5 onward. When you get to the part where you stitch along the curved hems to stabilize them before hemming, you can skip that part.
When you get to Step 14 (Hem Garment), press and fold up each hem twice, and edgestitch along the first fold to finish the hems between the vents. How much to fold up for the hems? You can use anywhere from a 1” to a 1.5” hem allowance, depending on how long you want your top to be. For a 1” hem allowance, fold up 1/4” and then 3/4”; for a 1.5” hem allowance, you can fold up 1/2” and then 1” (or even 1/4” and then 1.25”). Up to you!

A quick note about this fabric:
I love this navy ikat fabric!! The loose weave of this type of ikat cotton makes it super comfortable to wear, which is why this category of fabrics (“loose-weave cottons”) always makes it onto my “Rae’s favorite fabrics for apparels” lists (example here). Related: the Warp and Weft fabric fabric lines designed by Alexia Abegg for Ruby Star also often have a number of loose-weave, lightweight cottons that would be perfect for Beatrix or Gemma.
You can find the Beatrix pattern - now available in a NEW SIZE RANGE — in my shop, read more about the update here, and get more tutorials for Beatrix, including the Beatrix sewalong, on the Beatrix page!