
Garnet Sewalong: Steps 5 & 6 AKA BURRITO DAY!
Welcome to Day 3 of the Garnet Sewalong!
{If you’re just joining us, check out the Garnet Sewalong Intro post here.}
Want to see me sew Garnet on video? Join the Cosmic Sewing Club via the paid tier of my Substack to get access of the sewalong posts with BONUS VIDEO!!

Today we’ll be sewing the main yoke and yoke lining together, and….drumroll, please!!!…tackling the burrito method for attaching the bottom of the yoke lining. Where. Is. BURRITO. EMOJI. Nvmd found it: 🌯
If you’re following along in your pattern, this is Steps 5 and 6.

STEP 5. SEW NECKLINE
It’s time to take your yoke lining and pin it to the main yoke around the neckline.
Sew it together with a 1/2” [13 mm] seam, backstitching a few times at each of the corners to make sure those seams are nice and strong. Then press that seam.
🔥 hot tip 🔥
Sew this seam TWICE, to really reinforce it! I especially recommend this if you are using a delicate or loose weave fabric, such as linen or double gauze, for your yoke.
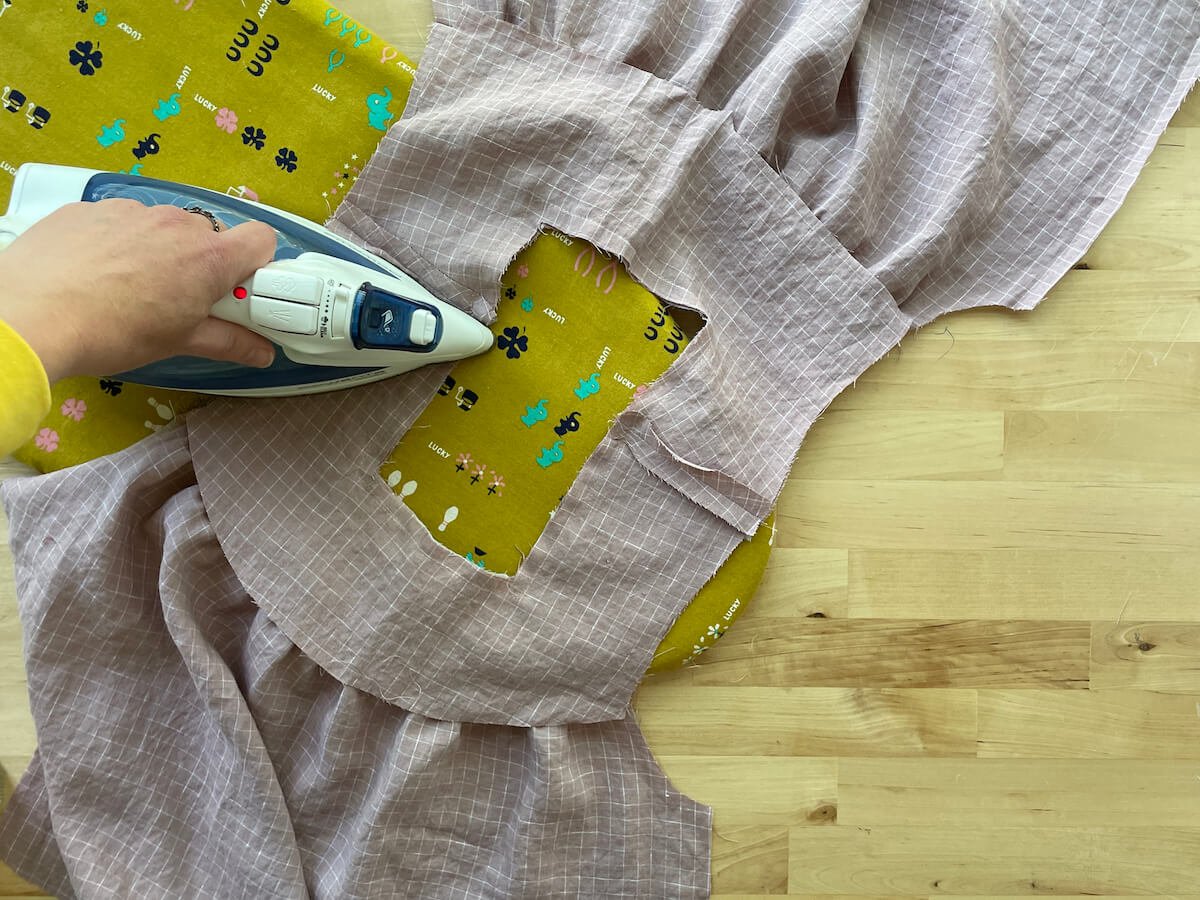
Trim the seam to 1/4” [6 mm], then clip and grade the corners. Be very careful at this point not to clip through the stitches in the seam, but you want to get as close as possible so that your corners won’t pucker.


Flip the lining to the inside of the garment, and press the neckline, especially those corners!

There should not be any puckering at the corners; if there is, go back and re-clip them (veeeery carefully!), and press again.
Optional: Understitch the neckline seam if you would like; however, do not understitch the corners (just skip those), or you definitely will get corner puckering!

STEP 6. ATTACH BOTTOM OF YOKE LINING (BURRITO METHOD)
This is the most “advanced” part of the Garnet top construction, attaching the bottoms of the lining along the bottom of the yoke: BURRITO TIME.
Alternative option: you can just press under the bottom 3/8” of the yoke lining, pin along the gathered seams, and either hand-stitch or stitch in the ditch to attach the bottom. This is the same technique as is used in the Geranium pattern (bottom of bodice lining) and Rose and Cleo patterns (inside of waistband), so if you’re familiar with that technique and want to do that instead, feel free!
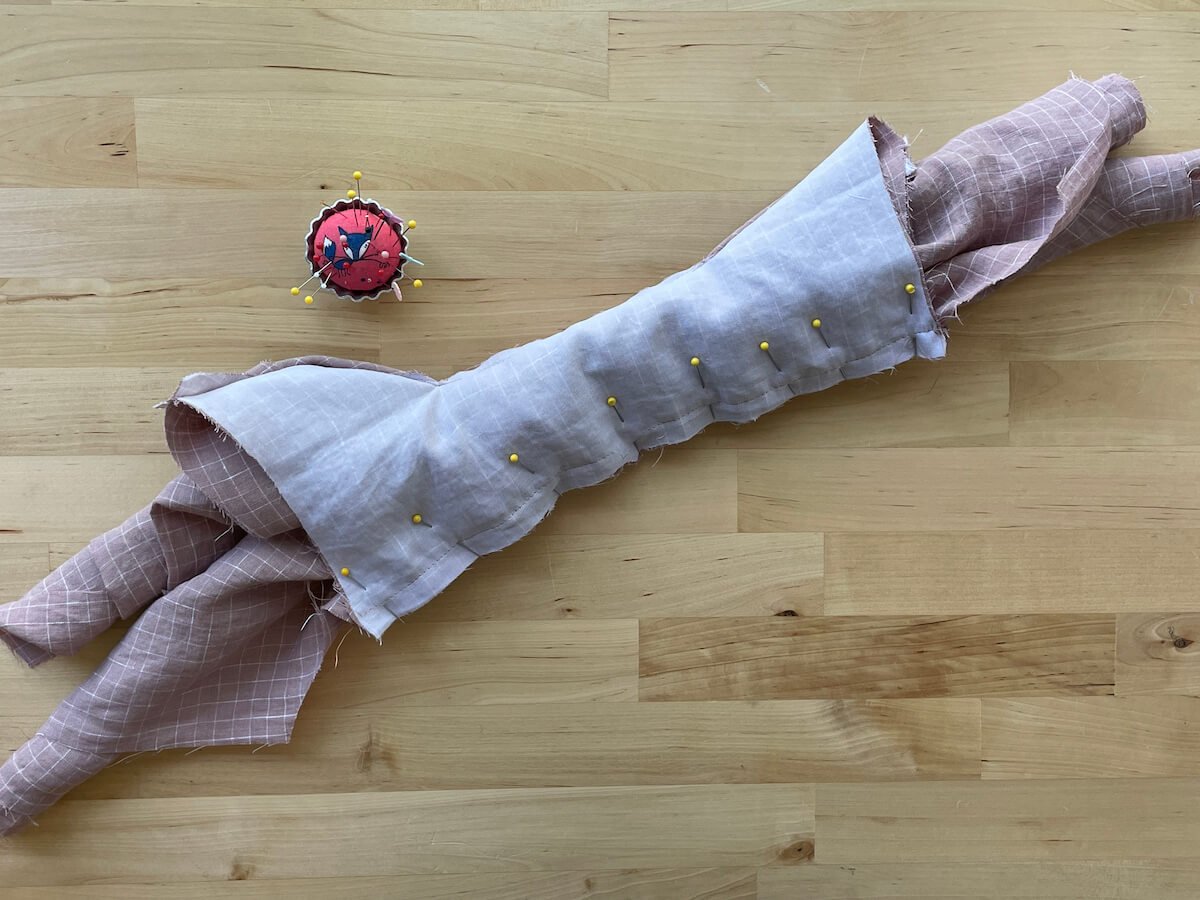
Start by laying your garment out flat, with the wrong side & yoke lining facing up. We’re going to do the back yoke first, which is shown at the bottom of this photo, while the (more curved) front yoke is shown at the top:

Roll the front and back up to help keep them out of the way, and place the rolled-up back underneath the yoke, as shown below. Now grab the bottom edge of the back yoke…

…and take it up (in this photo, “up” literally means toward the top of the photo), over, around, and under the front yoke/rolled-up front, and back around to meet the bottom edge of the main back yoke (where it is attached to the gathered back seam).

Pin the bottom edge of the back yoke lining along the bottom edge of the back yoke, pushing the rolled up part of the back away from the pins if possible. The pins should be going through three layers: back yoke, back yoke lining, and the top of the back (which should be gathered). The yoke pieces will sandwich the gathered layer.
Bring this over to your machine and sew it all together through the three layers just mentioned. Keep the interfaced back yoke on top, so that you can sew directly over the stitch line you used to attach the gathered back to the back yoke.

Remove your pins.
Now it’s time to gently pull the rolled up portions of your garment (the front and back) out of the “burrito” you’ve just sewn, and turn the yoke right-side out.
Grab a rolled up part from one side, and gently tug and pull until you’ve managed to turn the entire yoke back right-side-out.
Just want to take a moment to acknowledge that it’s SUPER HARD to show this part with photos. If you’re feeling frustrated, remember that it may be easiest to be sewing along at the same time so you have your garment in front of you to compare.
{Annnnd…if you’d like to see me demonstrate this on video — quick reminder — you can do that if you sign up for the paid tier of my Substack aka the Cosmic Sewing Club. You’ll be able to see all of the Garnet sewalong posts with bonus videos, including the one for this method.}

At this point you should have a fully finished back yoke (bottom of photo above), but the front yoke lining should still be unattached (top of photo above).
REPEAT what you just did for the back yoke, but this time with the front yoke and front yoke lining.
The front yoke is narrower than the back yoke, so you’ll have a little less room this time (that’s why we did the back first). Be very gentle and careful when pulling the garment out of the “burrito.”

Once you’ve pulled the entire thing out of the burrito and turned everything right side out again, carefully press the entire yoke again, being careful not to crush the gathers with the iron.

PHEW! Big day today! Time to take a break and admire your beautifully finished yoke.
TOMORROW: We’ll attach the sleeves and sew the side seams!
Are you sewing along with these posts? Tag me (@madebyrae) and use the hashtag #MBRgarnet when you share your pics! Thanks for joining in our sewalong!!
Get pattern details, view size and yardage charts, and materials on the Garnet Page.
Still need the pattern? You can find it in my shop: