Trillium Maxi Dress Tutorial
Please note: The pattern previously known as “Washi” has been renamed “Trillium.” Read about the name change here. It’s the same lovely pattern, just with a new name!
You are going to laugh that I am even calling this a "tutorial," it's so campy. But that's how this one is happening. It's been campified. New word. You would rather that I spent my time cooking up more new and exciting things for you rather than making my tutorials look more profesh, right? If not, now's the time to speak up. S'all I'm saying.
So before I give you a detailed how-to, here are the key speaking points for making a Trillium Dress into a maxi (floor-length dress):
Lengthen the skirt pieces so they are long enough
Widen the skirt pieces so they don't trip you when you walk
The key points to remember if you want it fully lined:
the lining does not need pockets
the front skirt of the lining does not need to be pleated (that adds bulk at your waist, NO GOOD), so you must trim the sides to make the front skirt the same width as the front bodice
if you make the lining the same length as the dress, you can hem the dress over the bottom of the lining
if you make the lining shorter than the dress (eg knee-length like I did), you need to finish the bottom edge of the lining and then hand-stitch the bottom corners of the lining to the side seam allowances of the dress so that it stays put.
you do not need to do the shirring in the back for the lining, but I like to do just one line of shirring so that it gathers a little
it may still help to cut a small piece of interfacing and attach it to the back of the front bodice around that little "U" shape to help keep that looking spiffy, as shown in this pic:
for the fully lined version, you need to sew the neckline, armholes and side seams in the exact same way as I sewed the bodice lining in my Bodice Lining Video Series (specifically, you should watch videos III, IV, V)
Finally, if you want to make it sleeveless:
I usually trim 1/2" off of the outside of the shoulder along the armhole (front and back, and linings) to make a narrower width over the shoulder. I think this looks better and is quite easy to do. Here's a picture:
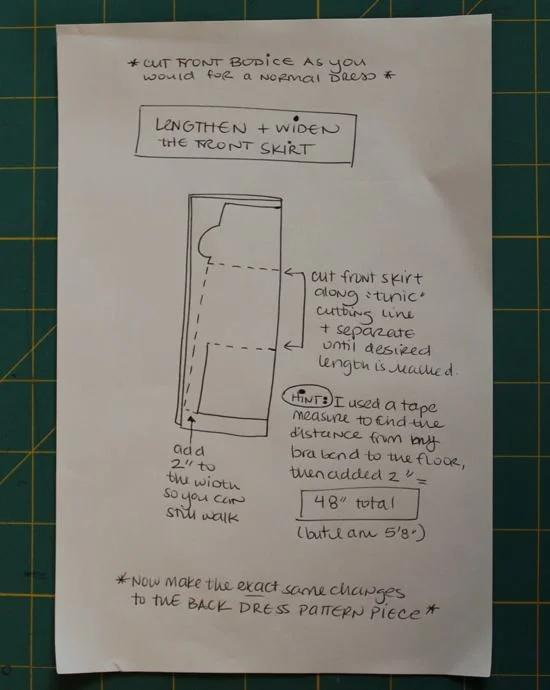
Are you ready for some diagrams? Here are my notes on how I made the maxi version, including fabulous hand-drawn illustrations to amaze and amuse you (click on the images to view larger).
Step 1: Cut out your dress pieces, the bodice, front skirt, and back dress with the following modifications:
Just in case you can't read that hint, it says: "I used a tape measure to find the distance from my bra band to the floor, then added 2" = 48" total (but I am 5'8")"
Step 2: Cut out and assemble your lining
Step 3: Assemble the outside of the dress, and attach to lining
Any questions? I'd be happy to answer any in the comments section (or update the post as needed), so let me know if I can clarify anything! Still need the pattern?
If you've made your very own Trillium be sure to tag your photos with #MBRtrillium so we can all admire them.


