UPDATED! The ever-popular Baby Sunsuit Tutorial
** I couldn't let yet ANOTHER summer go by without updating this oldie-but-goodie tutorial! I hope you'll enjoy this sunsuit tutorial, new and improved! **
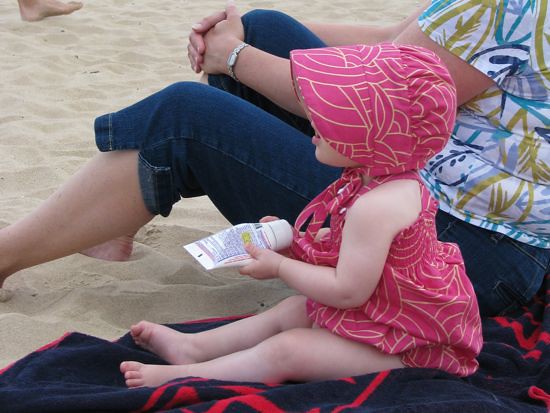
This is an update to the original Baby Sunsuit Tutorial, which was posted over two years ago (has it really been that long...YIKES!) as part of the Baby Bonanza series over on luvinthemommyhood. This sunsuit is completely adorable and makes a great gift for a baby. Clementine used to love hers as you can plainly see:
(I can't resist showing this photograph over and over. It's a classic. It's fine with me if you pin it, but please don't use it anywhere else without permission. Once it turned up on some random parenting website (?!?) Thanks to an eagle-eyed reader for catching that one!)
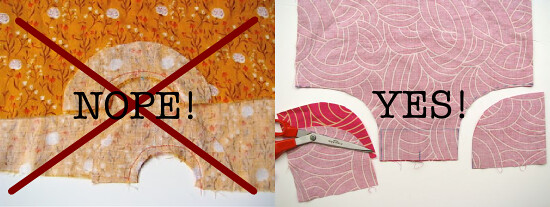
Why post this tutorial again? I wanted to correct some of the "issues" that popped up with the first version of the tutorial, mainly involving the snap closure at the bottom. In a nutshell the changes are: instead of cutting out a curved piece for the bottom closure, you trim out the corners of the rectangles you start with, and use the piece left behind for the snap closures:
I think you'll find this way is easier and quicker to sew, and it eliminates some of the "side bulk" the original tutorial had. Here's a quick run-through (and stick around, there's a FREE PDF instruction sheet at the end!):
1: Cut two rectangles of fabric. Their width should be [your baby's chest measurement - 3"], and the length should be [the measurement from crotch to neck (the length of their torso) + 2"] -- if you need a general number because you don't have a baby on hand to measure, cut 16" wide x 19" long...that's about a 6-12 month size. note: The rectangles are shown sideways in the photo above, with the grain running horizontally across the photo.
2: Now you need to draw the leg holes. Along the bottom (usually shorter) edge of your rectangles, make a mark at the center with your marking pen, then draw a line 2.5" from either side of center along the bottom edge and 2" high. This will create a 5"x2" rectangle that will become the snap panel between the legs. Then make another mark along each side, 5" from the bottom, and connect the rectangle to this mark with a nice curved line.
3: Cut these curved areas out.
4: Sew the long sides of the sunsuit together, right sides facing, with a 1/2" seam.
5: Fold up 1/2" at the bottom of each rectangle toward the wrong side and press.
6: Fold another 3/4" up, this time towards the right side of the fabric, and press. Stitch the sides down, 1/2" away from each edge.
7: Clip the bottom corners with a scissors close to the stitching, then turn this part right-side-out, use a pencil or knitting needle to push out those corners, and press. This will become your snap panel.
8: Fold under 1/4" twice around the legholes, and pin in place.
9: Now sew all the way around the bottom of the legholes and snap panels, stitching as close to the folded edge as possible (this is called "edgestitching.")
10: Finish the top edge of the sunsuit opposite the legholes. You can do this by folding over the top edge 1/4" twice and stitching down, or doing a rolled hem or zig-zag stitch, up to you.
Shirring: Loosely wind elastic thread (I recommend Gutermann, not Dritz) around your bobbin, load it into your machine (you may need to loosen your bobbin tension a bit with the little screwdriver if you have a front-loading bobbin), and sew with thread on top and elastic thread in the bobbin around the top of the sunsuit for 6 rows, keeping each row of shirring about 1/2" apart (see my shirring tutorial for more shirring resources) so that you have about 3" of shirring.
11. Keep the elastic thread in the bobbin and sew along the legholes back and forth for 2-4 rows, about 1/8" apart. Use your iron and lots of steam to press the elastic thread, both at the top and bottom of the sunsuit. It should shrink up nicely.
12. Add snaps to front and back. Remember that the snaps should go on the bottom of the front snap panel, but the top of the back snap panel in order to overlap properly!
**Do you hate putting snaps on something? Try cutting off the snaps from an old onesie and stitching them onto the bottom panels instead, like I did below. It's a little tricky sewing around the snaps, but if you can manage, it's pretty easy!**
OK, we're almost done!
13: Make the straps: Cut two strips 2" wide by half your rectangle length; for the 6-12 month size, 2"x9.5" is great. Go to my Easy Strap Tutorial to see how I made my 3/4″ wide straps. I put buttonholes in the ends but you could also use snaps here. Another option would be to do a pair of ties at each shoulder.
14: Stretch out the top edge and mark 3.5" from center on both the front and back of the sunsuit. Pin your straps to the front at each mark about 1/2" from the end of each strap. Try the sunsuit on your baby if possible to check the strap length. Sew your straps down at each mark.
15: Sew your buttons to the back top edge, again 3.5" from center. Cross the straps in back, and you're done!Put the sunsuit on your baby (preferably with a matching Peekaboo Bonnet) and enjoy! Here's a couple finished shots on Clementine:
And on the recepient of the pink one, Baby A:
The other day I found this page of sunsuit diagrams and instructions that I had all but forgotten about after we moved last year. Written with little hand-drawn diagrams onto a 1-page sheet, ready to scan. Seriously? Sometimes I amaze myself. So it's now ready for you to download and print, just in time for summer sewing.The only thing I would say is if you're going to use this sheet, sew the sides together after you've cut out the legholes (step 7), instead of before. Not a big deal, just something I realized after I'd drawn the whole thing out and was too lazy to go back and change. It's also missing the part about the straps and buttons, but hey, it's free (read: CAMPY)! Enjoy!
Click on the image above for your very own 1-page Sunsuit Instruction sheet.
DO NOT DISTRIBUTE OR RE-SELL THIS PDF WITHOUT PERMISSION! THANKS!
Have a great weekend everyone!


