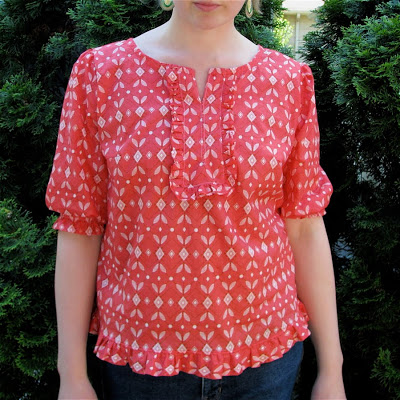
Rae's Prairie Girl Top
Hello everyone! One of the advantages of having this be my blog is that I can divert your attention from voting for today's tops by showing off one of mine. The other advantage of course is that I didn't have to have them all finished by Friday night. And really, neither did you. If you've just finished up or you finish one this week, please post it to our Spring Top Week Pool! It won't get entered in the contest anymore, but we'll still get to see what you're working on and be inspired by your patterns and ideas.
Right now in my sewing room there is a heap of tops in various states of completion/disarray. Only time will tell if I'll meet my goal of five tops this week. Here's the first one to be completed, although let's call it a work-in-progress, shall we?
Fabric: Anna Maria Horner Little Folks Voile
Like everyone else who's used this fabric, I've found this cotton voile incredibly enjoyable to work with. I've heard others describe it as "buttery" and that is true. It's also silky without being shiny or slippery and is extremely forgiving in addition to being machine washable. Big plus for me. Now that I've used up a few yards on these tops, I can't wait to buy more of this (I really like the yellow deer print and the solids). If you'd like to buy it Phat Fabric and Fabricworm (two of the Spring Top Week sponsors) both carry a great selection; Fabricworm is also giving away 2 yds of it as part of one of the prize packages)
Pattern: Summer Blouse from Weekend Sewing by Heather Ross with modifications
I received my very own signed copy of this book in the mail from Heather last Christmas last (you might wonder why? More on that later.) and this was the first project I wanted to try. Then Celebrate the Boy happened in February and I made a variation of the Kai shirt for Elliot. Now that I'm back to selfish sewing, I'm glad I had a chance to try it out.
If you want to try making a similar version of your own, here is a rundown of the modifications I made:
- Chop off the placket piece at 11" so it's square at the bottom. Cut a 2" wide strip of fabric, fold in half, and gather along the raw edge. Pin and baste to the edge of the placket, iron outward, and attach placket to the outside of the top rather than the inside.
- Cut the neckline so that it's narrower (my pattern pieces were 4.5" along the shoulder seam, size M) and about four inches deeper in front.
- Add 4" to the center of the sleeve pieces and gather the tops to make them fit.
- Cut off the sleeves mid-forearm, fold under about 3" at the bottoms of the sleeves, and add a 1/2" elastic casing to gather with elastic.
- Add a ruffle to the bottom: cut a 3.5" strip 50" long, gather and pin to the bottom of the hem (match raw edge to raw edge on the outside of the top, sew and iron down, and then finish the edge so it won't fray.
- Add three rows of elastic shirring to the back (about 8" long)
So overall I'm happy with it; lovely fabric, lovely pattern. It's still a work-in-progress because it came out a little large. I still would like to shape the side seems a little more, make it slightly less roomy. My shirring helped a little with this but next time I'm definitely making a size smaller. Being a tall person, I could have used it a little longer too. That's totally my fault, usually I measure the pattern pieces before I begin to make sure they'll fit and this time I just barreled ahead. Silly. And oh yes, it wasn't until I took these pictures this morning that I realized how totally WONK the placket bottom is. It looks fine in the top photo but it's actually slightly crooked as you can see in the others. So I tore that out already and just need to tack it down again properly.
And what do we think about some leetle covered buttons for a closure instead of the sewn-shut opening? That might be really nice. Or maybe shirring all the way around the waist? OK, that's all for now, E's up from his nap. Don't forget to VOTE!


